Recording MP4 Video Files (XF200 / XF205)
Giải pháp
This section explains the recording basics for MP4 clips.
"Clip" refers to a single movie unit recorded with a single recording operation.
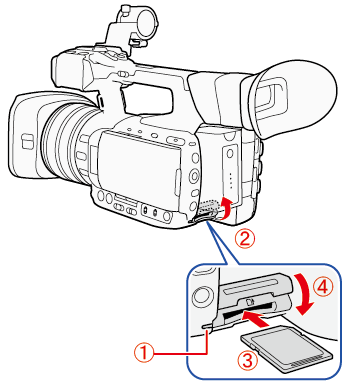
 . Make sure the SD card access indicator is off.
 . Open the SD card slot cover.
 . Insert the SD card, with the label facing up, all the way into the SD card slot until it clicks.
 . Close the SD card slot cover.
IMPORTANT
- Do not force the cover closed if the SD card is not correctly inserted.
- Observe the following precautions while the SD card access indicator is on or flashing. Failure to do so may result in permanent data loss.
- Do not disconnect the power source or turn off the camcorder.
- Do not remove the SD card.
- SD cards have front and back sides that are not interchangeable. Inserting an SD card facing the wrong direction can cause a malfunction of the camcorder. Be sure to insert the SD card as described in the procedure above.
- Be sure to save your recordings regularly, especially after making important recordings. Canon shall not be liable for any loss or corruption of data.
NOTE
- Preventing data from being erased accidentally
SD cards: SD cards have a physical switch to prevent writing on the card so as to avoid the accidental erasure of the card’s content. To write-protect the SD card, set the switch to the LOCK position.
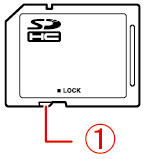 : [LOCK] switch
- SD card access indicator
On or flashing: The card is being accessed.
Off: The card is not being accessed or no card is inserted.
MP4 Video Format
| Bit rate | Resolution | Audio bit rate | Frame rate | ||
|---|---|---|---|---|---|
| 59.94P | 29.97P | 23.98P | |||
| 35 Mbps | 1920×1080 | 256 kbps | ○ | - | - |
| 24 Mbps | - | ○ | ○ | ||
| 17 Mbps | 1280×720 | 128 kbps | ○ | - | - |
| 9 Mbps | - | ○ | ○ | ||
| 3 Mbps* | 640×360 | - | ○ | ○ | |
1. Hold down the button on the <POWER> switch and slide the switch to <CAMERA>.
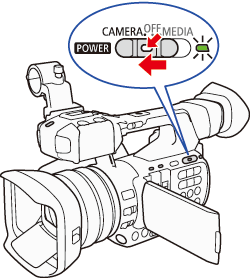
- The camcorder turns on, and enters record pause mode (STBY).
The access indicators of card slots with recording media will illuminate momentarily in red.
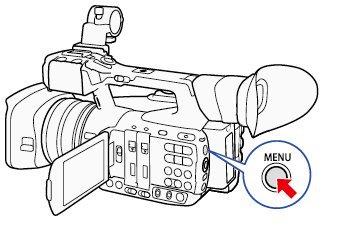
2. Press the <MENU> button.
3. Select the movie format.
Push the joystick up/down to select [  Other Functions] -> [Movie Format].
Other Functions] -> [Movie Format].Select [MP4] then press <SET>.
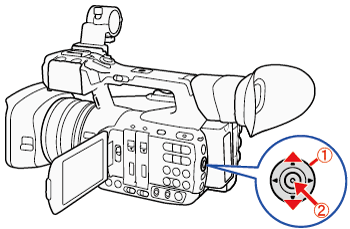 : Joystick: In the following procedures, 'Press <SET>' refers to the action of pressing the joystick straight down to select the desired setting.
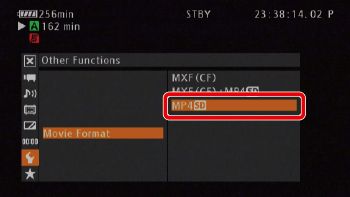
NOTE
A CF card must be inserted to record [MXF (CF)+MP4] clips.
4. Select the bit rate and resolution.
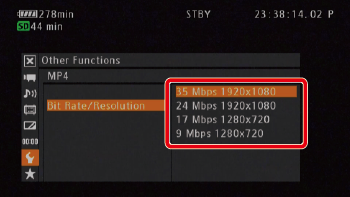
Select [ Other Functions] -> [MP4] -> [Bit Rate/Resolution].
Other Functions] -> [MP4] -> [Bit Rate/Resolution].Select the desired option and then press <SET>.
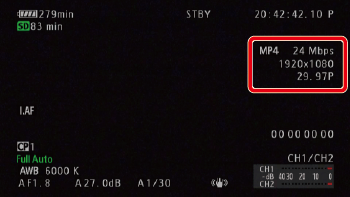
- The selected bit rate and resolution will appear on the upper right of the screen. However, when the movie format is set to MXF+MP4,only the bit rate and resolution of the MXF clips will appear on the screen.
5. Select the Frame Rate.
Select Other Functions] -> [MP4] -> [Frame Rate].
Other Functions] -> [MP4] -> [Frame Rate].Select the desired option then press <SET>.
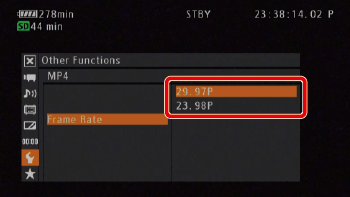
The selected frame rate will appear on the upper right of the screen.
REFERENCE
When [Bit Rate/Resolution] is set to [35 Mbps 1920x1080] or [17 Mbps 1280x720] (MP4 clips), the frame rate is set to 59.94P automatically and cannot be changed.
6. Press the <MENU> button to exit the setting.
NOTE
For more information on the signal from individual output terminals, please refer to Video Output Signals by Terminal (XF200 / XF205).
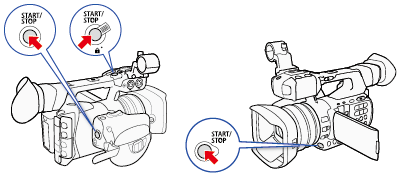
1. Press the <START/STOP> button to begin recording.
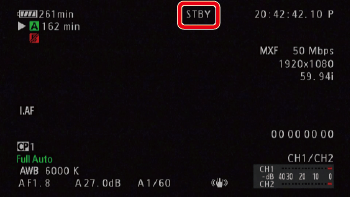
2. Recording starts. The front and rear tally lamps illuminate () and, depending on the movie format selected, [  REC], [ MP4] or both displays will appear at the top of the screen.
) and, depending on the movie format selected, [ REC], [ MP4] or both displays will appear at the top of the screen.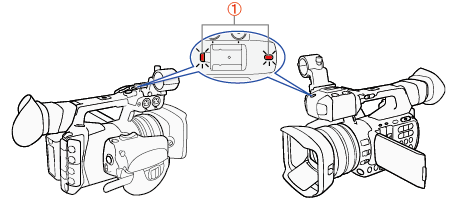
REFERENCE
You can use the <START/STOP> button on the grip, on the handle or at the front of the camcorder (next to the lens).
When you use the supplied wireless controller, press the <START/STOP> button and the record enable button simultaneously.
For details about MP4 recording when the video format is set to MXF+MP4, refer to Simultaneous Recording of MXF and MP4 Clips (XF200 / XF205).
3. Press the <START/STOP> button to pause the recording.
The clip is recorded on the recording media and the camcorder enters record pause mode (STBY). The tally lamps will also go out.
NOTE
The <START/STOP> button on the handle has a lock lever to prevent accidental operation. Set the lock lever to <  > if you do not want a recording inadvertently paused or if you do not plan to use that <START/STOP> button. Return the lever to its previous position to enable use of the <START/STOP> button again.
> if you do not want a recording inadvertently paused or if you do not plan to use that <START/STOP> button. Return the lever to its previous position to enable use of the <START/STOP> button again.- You can use [Other Functions] > [Review Recording] to review part or all of the last clip recorded.
- You can use [Other Functions] > [Delete Last Clip] to delete the last clip recorded. However, you cannot delete the last clip if double slot recording is activated or if the video format is set to MXF+MP4.
REFERENCE
MP4 Clips:
- MP4 clips are assigned consecutive file numbers that consist of 7 digits, like "100-0001". The first 3 digits indicate the folder where the file is saved and the last 4 digits are a unique identifier for each file. You can select how the files are numbered.
- For scenes with a long recording time, the video (stream) file in a clip will be split in the following cases. Even in such case, playback will be continuous. Using Data Import Utility, you can join such split files and save them on a computer as a single clip.
- When the file size reaches approximately 4 GB.
- After recording a single clip continuously for approximately 29 minutes 50 seconds (frame rate set to 59.94P) or for approximately 59 minutes 50 seconds (other frame rates).
- A single MP4 recording operation can go on continuously for about 12 hours. Then the camcorder will stop automatically.